SSH Raspberry Pi IoT Projects - Connecting Your Creations
Have you ever thought about how amazing it would be to control your little computer projects from anywhere, perhaps a tiny device doing something cool in your garden or a smart home gadget keeping an eye on things? Well, that's where something called SSH really shines, especially when you're working with Raspberry Pi for your Internet of Things (IoT) ideas. It's a way to talk to your Pi securely, almost like having a secret, protected line directly to it, no matter where it is. This connection lets you check in, make changes, and even fix things without needing to be right next to your device.
You see, getting your tiny computers to communicate reliably is pretty important for any project that lives out in the real world, like those IoT setups. Sometimes, connections can be a bit finicky, dropping off if you leave them alone for a bit. This can be really frustrating, particularly when you're trying to manage a remote sensor or a smart light. But there are clever ways around these little hiccups, making sure your Pi is always ready for your commands, which is, you know, quite helpful.
We'll look at how this secure way of talking to your devices makes all sorts of neat things possible, from keeping your connection alive to making sure your code changes are smooth and safe. We'll also touch on how to handle those times when your computer asks for passwords over and over, and how to sort out those tricky key differences. It's all about making your experience with your Raspberry Pi IoT projects as easy and as secure as can be, so you can focus on building cool stuff, which is what we all want, right?
- Vince Papale The Inspiring Journey Of An Underdog
- Discovering The Best Ice Cream In La Jolla A Sweet Adventure
- The Legacy Of The Jackson Family A Journey Through Time
- A Journey Through Ashley Judds Movies A Cinematic Tribute
- Unveiling Bad Bunnys Height The Impact Of His Stature On His Fame
Table of Contents
- Understanding the Basics of SSH for Raspberry Pi IoT Projects
- How Do We Keep Our SSH Raspberry Pi IoT Projects Connected?
- Managing Your Code with SSH Raspberry Pi IoT Projects - What About Git and Keys?
- Why Does My SSH Raspberry Pi IoT Projects Setup Ask for My Password Repeatedly?
- Are There Visual Tools for SSH Raspberry Pi IoT Projects, and What If They Don't Show Up?
- What Happens When SSH Keys for My Raspberry Pi IoT Projects Don't Match?
- Making Sure Your SSH Raspberry Pi IoT Projects Are Always Ready to Go
- Getting Your SSH Raspberry Pi IoT Projects Ready for Anything
Understanding the Basics of SSH for Raspberry Pi IoT Projects
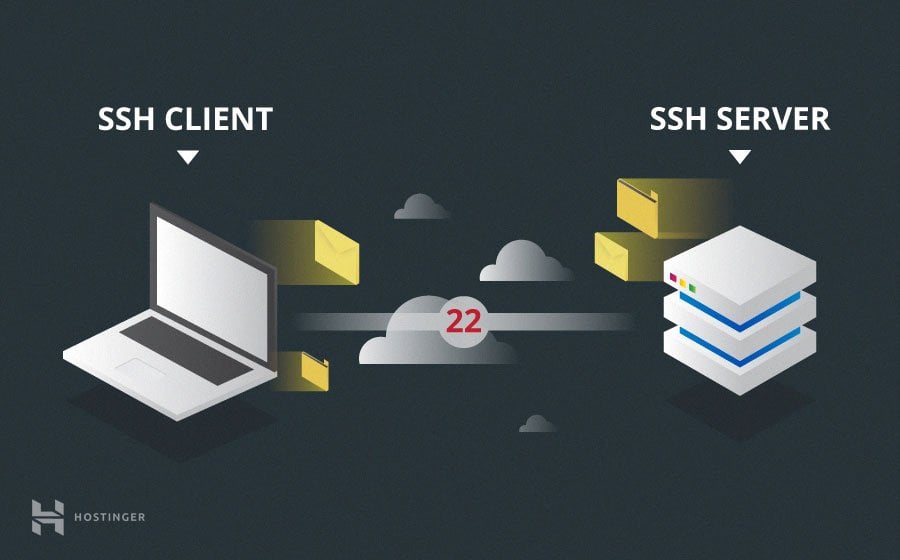
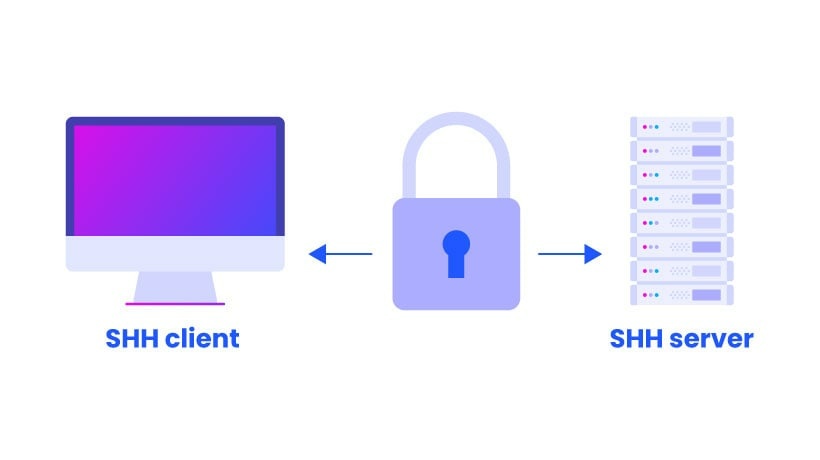
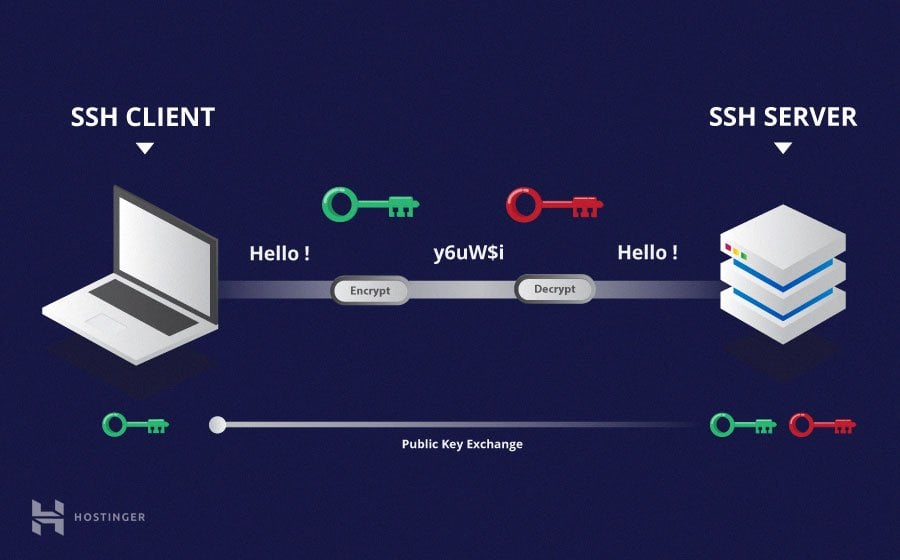
So, what exactly is this SSH thing, anyway? Well, it stands for Secure Shell, and it's basically a very safe way for computers to talk to each other over a network that might not be so safe. Think of it like sending a secret message in a locked box; only the person with the right key can open it and read what's inside. For your Raspberry Pi IoT projects, this means you can log in to your Pi, send commands, or move files around without worrying too much about someone else peeking at your information. It's pretty fundamental for working with devices that are not sitting right next to you, which is, you know, a very common situation with IoT gadgets.
This secure connection is what lets you manage your smart home hub from your phone when you're away, or check on that remote weather sensor without having to drive out to it. It makes it possible to have your little Pi doing its job out in the world, while you can still have complete control over it from your desk. It's a rather simple concept at its heart, but it opens up a whole lot of possibilities for how you build and manage your creative setups. You see, without this kind of security, sending commands or sensitive data over the internet would be like shouting your secrets in a crowded room, which is not what you want for your private projects, honestly.
How Do We Keep Our SSH Raspberry Pi IoT Projects Connected?
You know how sometimes you're working on a distant computer, maybe through a program like Putty, and if you step away for a bit, the connection just drops? It's a bit annoying, isn't it? This often happens because the computer you're connecting to, the host server, decides after a certain amount of quiet time that your connection is no longer needed and just cuts it off. It's like a bouncer at a club saying, "If you're not dancing, you're not staying," which is, you know, a bit strict.
- What Happened To The Cast Of Everybody Loves Raymond Now
- Unraveling The Mystery Why Did The Derricos Divorce
- Zoe Perrys Spouse Unveiling The Secrets Of Her Personal Life
- Tate Mcrae The Rising Star Of Pop Music
- Unveiling The Enigma Vincent Price Height And More
For your SSH Raspberry Pi IoT projects, having your connection suddenly disappear can be a real pain, especially if you're in the middle of checking sensor readings or pushing out a new piece of code. Luckily, there's a neat trick to help keep that line open. Your connection program, like Putty, can be set up to send tiny, empty messages, sometimes called "null SSH packets," to the other computer. These little pings are just enough to let the host server know you're still there and still interested in keeping the conversation going. It's a simple way to say, "Hey, I'm still here!" without actually saying anything important, which is, in a way, quite clever.
This little technique means your remote control over your Pi doesn't suddenly vanish. You can go grab a cup of coffee, come back, and your connection is still active, ready for you to pick up right where you left off. It's a rather small adjustment that makes a really big difference in how smoothly you can manage your distant IoT devices. So, keeping your SSH Raspberry Pi IoT projects linked up is often about these small, smart adjustments, which is pretty cool.
Managing Your Code with SSH Raspberry Pi IoT Projects - What About Git and Keys?
When you're building something cool with your Raspberry Pi, especially for IoT, you're probably writing code. And when you're writing code, you often use a system like Git to keep track of all your changes. It's like a super-organized notebook for your programming ideas. You start a new project, tell Git to keep an eye on it, add your code, and then save those changes with a little note about what you did. This is, you know, pretty standard practice for anyone making things with code.
Now, sometimes you want to take that entire project, with all its history and notes, and put a copy of it on another machine. Maybe it's a backup server, or perhaps another Raspberry Pi that's going to run a slightly different version of your IoT setup. You might want to create what's called a "bare clone" of your project. This is a special copy that only holds the history of your changes, not the actual working files, which is, in some respects, quite efficient. It's a handy way to share your project's entire past without cluttering up the new machine with all the current files, so it's very useful for centralizing your code.
When you're doing this, especially when you're moving things between computers, you often need to make sure your identity is known and trusted. This is where those SSH keys come into play again. People often suggest using a tool like a "keychain" to remember your identity, so you don't have to keep typing it in every single time. It helps your computer remember who you are, making the whole process much smoother and less repetitive. It's a bit like having a digital ID card that your computer can show for you, which is, you know, quite convenient for your SSH Raspberry Pi IoT projects.
However, sometimes the instructions on how to use a very specific key for a specific task aren't always crystal clear. You might have several keys, and you want to tell your system, "Use *this* particular key for *this* connection, and no other." The existing information might not spell out exactly how to make that happen explicitly. This can be a bit of a puzzle, especially if you're trying to set up a very secure and particular connection for your SSH Raspberry Pi IoT projects. Getting this right is rather important for keeping your code safe and your workflow simple, so it's worth figuring out.
Why Does My SSH Raspberry Pi IoT Projects Setup Ask for My Password Repeatedly?
Have you ever tried to get the latest version of your code from a service like GitHub, using a command like `git pull`, and it just keeps asking for your username and password, over and over again? It's pretty annoying, isn't it? It feels like you just told it who you are a moment ago, but it forgot. This happens quite a lot when your system isn't set up to use your SSH keys for authentication, which is, you know, a common point of frustration for many people working on SSH Raspberry Pi IoT projects.
The thing is, you likely have a special SSH key, a sort of digital fingerprint, that you've already given to GitHub. This key is meant to tell GitHub, "Hey, it's me! You can trust this connection without needing a password." But if your computer isn't told to use that key specifically when it talks to GitHub, it falls back to the old way: asking for your username and password every single time. It's a bit like having a special VIP pass but forgetting to show it at the door, so you still have to wait in the regular line, which is not ideal, really.
What you want to do is tell your system, very clearly, "From now on, when I connect to GitHub, please use *this* SSH key." Once you set that up, you should, in theory, never have to type your username and password for GitHub again when you're pulling or pushing code. This makes managing your code for your SSH Raspberry Pi IoT projects much smoother and less of a chore. It's a small change that saves a lot of time and effort in the long run, which is, you know, what we're all looking for in our daily work.
Are There Visual Tools for SSH Raspberry Pi IoT Projects, and What If They Don't Show Up?
Sometimes, when you're working with your Raspberry Pi, you might want to use a program that has a graphical interface, something with windows and buttons, rather than just typing commands into a black screen. This is often called "X11 forwarding," and it lets the visual part of a program running on your Pi show up on your computer's screen. It's a pretty neat trick, allowing you to use desktop applications on your tiny remote computer, which is, you know, quite useful for certain SSH Raspberry Pi IoT projects.
However, if you try to run such a program and nothing shows up, or you get a message saying "display is not set," it means your SSH connection isn't set up to send those visual bits over. It's like trying to watch a movie on a TV that isn't plugged in; the movie is playing, but you can't see it. This can be a bit confusing, especially if you expect a window to pop up and it just doesn't, which is, in a way, a common hurdle for those just starting out.
To check if your SSH connection is actually trying to send those visual parts, you can look at the messages it gives you when you connect. You'd be looking for a line that specifically mentions "requesting X11 forwarding." If you see that line, it means your connection is at least trying to make the visual stuff happen. If you don't see it, then you know the problem is with the connection setup itself, not necessarily with the program you're trying to run. This little check helps you figure out what's going on and get those graphical tools working for your SSH Raspberry Pi IoT projects, which is, you know, pretty helpful for troubleshooting.
What Happens When SSH Keys for My Raspberry Pi IoT Projects Don't Match?
Every time you connect to a new computer using SSH, your computer remembers a special digital fingerprint, called a "host key," for that distant machine. It's like your computer keeping a record of what your friend's front door looks like. This is a very good security measure because if someone tries to pretend to be your friend's computer, your system will notice that the "door" looks different and warn you. It's a rather simple but powerful way to prevent bad guys from sneaking into your SSH Raspberry Pi IoT projects, which is, you know, very important for security.
But sometimes, you might get a message saying something like, "The ecdsa host key for 'myserver' differs from the key for the..." This means that the digital fingerprint your computer remembers for that distant machine, let's call it 'myserver,' is different from the one it's showing you now. This can happen for a few reasons. Maybe the distant computer's operating system was reinstalled, giving it a new fingerprint. Or, in a more worrying scenario, someone might actually be trying to trick your computer into connecting to a fake server, which is a bit scary, honestly.
When you see this message, it's a big red flag. You should stop and figure out why the key has changed before you proceed. It's a bit like your GPS telling you that the road ahead looks different from what it remembers. You wouldn't just drive on without checking, would you? For your SSH Raspberry Pi IoT projects, making sure the host keys match is a fundamental step in keeping your connections safe and sound. It's a reminder that security is an ongoing process, and paying attention to these warnings is key, which is, you know, pretty important for anyone working with remote devices.
Making Sure Your SSH Raspberry Pi IoT Projects Are Always Ready to Go
Keeping your Raspberry Pi IoT projects running smoothly means making sure they're always accessible and secure. We've talked about how connections can drop if left alone, and how sending tiny, silent messages can keep that link alive. This is rather helpful for remote sensors or home automation systems that need to be online all the time. It's a bit like having a continuous heartbeat for your connection, ensuring it never flatlines, which is, you know, quite reassuring when your devices are far away.
Then there's the whole business of managing your code. Using Git is a fantastic way to keep track of changes, and creating those "bare clones" helps you distribute your project's history efficiently. But the real time-saver comes from making sure your system uses your SSH keys properly. Nobody wants to type passwords endlessly, especially when you're just trying to update a tiny bit of code on your remote Pi. Setting up your keys correctly means your interactions with services like GitHub are swift and seamless, which is, you know, a huge benefit for your workflow.
And let's not forget about those times you want a visual tool from your Pi. Knowing how to check if X11 forwarding is happening, and understanding why it might not be, saves you a lot of head-scratching. It means you can use the right graphical applications for your SSH Raspberry Pi IoT projects, even if they're sitting in another room or another country. It's all about making sure your remote work feels as natural as if you were sitting right in front of your device, which is pretty neat.
Getting Your SSH Raspberry Pi IoT Projects Ready for Anything
So, we've covered quite a bit about making your SSH Raspberry Pi IoT projects more reliable and secure. From preventing those annoying connection drops by sending little "I'm still here" signals, to making sure your code updates are smooth and password-free with proper key setup, there are many ways to make your remote work simpler. We also looked at how to get those graphical programs to show up on your screen, and what to do when your computer warns you about a changed digital fingerprint from a distant server. It's all about building a solid foundation for your creative endeavors, which is, you know, pretty important.
The main takeaway here is that secure communication is the backbone of any good IoT setup. Whether you're managing a single sensor or a whole network of smart devices, having a reliable and safe way to interact with them is key. By understanding these little quirks and how to handle them, you're better equipped to build, maintain, and expand your Raspberry Pi creations with confidence. It's a bit like learning the ropes of a new craft; once you know the basics, the possibilities for what you can create just open up, which is, you know, really exciting for your SSH Raspberry Pi IoT projects.
Ultimately, making these small adjustments to your SSH setup can save you a lot of frustration and time. It means less worrying about dropped connections or endless password prompts, and more time focusing on the fun part: making your ideas come to life. Your tiny computers can do amazing things, and with a strong, secure connection, you're truly in control, no matter where they are. It's about empowering you to bring your imaginative concepts into the real world, which is, you know, the whole point of these kinds of projects, basically.
This article explored how SSH helps manage Raspberry Pi IoT projects, covering topics like keeping connections alive with null packets, managing code with Git and SSH keys to avoid repeated password prompts, troubleshooting X11 forwarding for visual tools, and understanding host key warnings for security. It provided insights into making remote work with your Pi more secure and efficient.
- Unmasking The Legacy Of Christian Bale As Batman
- Kelsey Grammer The Versatile Actor And His Journey Through Fame
- Love In The Spotlight Jason Tatum And Ella Mai
- Exploring The Timeless Elegance Of Walk On By By Dionne Warwick
- Shane Beamer A Rising Star In College Football Coaching
SSH Tutorial: What is SSH, Encryptions and Ports
What Is SSH? A Beginner’s Guide To Secure Shell - IPXO
Ssh
